
How to View Your Cabin Filter Health on Tesla Models

By Karan Singh
Tesla’s Service Mode is a feature that allows both users and technicians to diagnose and view vehicle information. With a recent update, you can now view the health of your vehicle’s cabin filter and Bio-Weapon Defense Mode’s HEPA filter.
Cabin Filter Health
To view your vehicle’s cabin filter health data, you’ll need to enable Service Mode. You can follow our guide on how to access Service Mode if you’re not familiar with it.
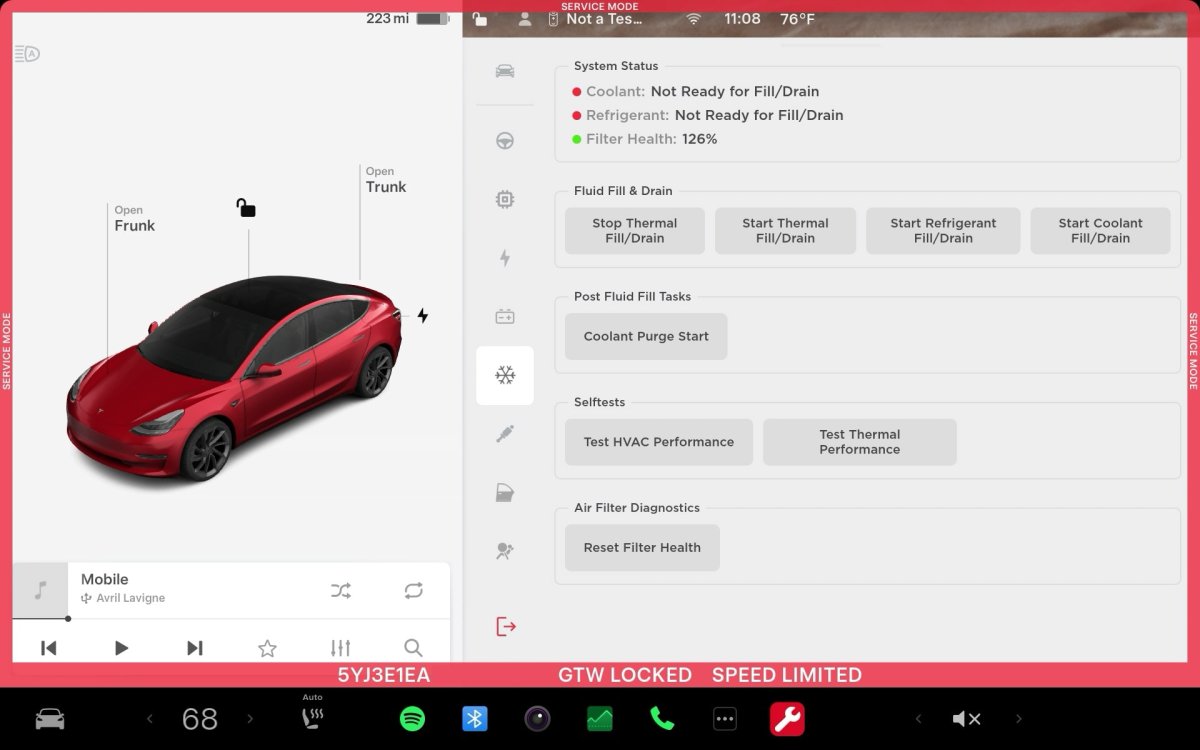
After enabling Service Mode you’ll want to navigate to the HVAC section. Here you’ll find a view of your vehicle’s entire HVAC system including a health meter for your cabin filter and HEPA filter (if equipped). The health readout is shown as a percentage of health, with a lower number indicating that the cabin filter needs to be replaced. However, we’ve also seen some users report they had a value over 100%. The health meter is intended to provide an approximation of the useful life of your Cabin Air filter.
Tesla likely approximates the health of the cabin filter based on the filter’s age and how many hours the HVAC system has been used. It may also consider the fan speed of the HVAC system to account for higher airflow through the filter.
If you have an Intel-powered infotainment unit (~2021 and older), you may not see the HVAC image displayed above, instead, you’ll see one like the image below, which will show you your cabin filter health near the top of the screen.
When to Replace
In general, Tesla recommends replacing the Cabin Air Filter every 2 years, and that the HEPA filter, for vehicles with access to Bio-Weapon Defence Mode, be replaced every 3 years, but this can vary depending on usage and the amount of debris going into the cabin.
Tesla is one of the few manufacturers, if not the only one, that continuously runs air through the cabin filter, even if you’re recirculating air from inside the vehicle. Most other vehicles will only run air through the cabin filter when it’s coming from outside. This helps the air inside the vehicle to become cleaner as it continues to be filtered.
How to Replace
The Cabin and HEPA Air filter replacement procedure is straightforward and could be a DIY task. Tesla provides instructions on a model-by-model basis on how to replace them, but in general, the basic steps are below.
The filter replacements can differ based on model year as well. High-voltage connections are also passing through the HVAC module, so extra caution is needed. We recommend reading your vehicle’s specific instructions before proceeding. They will advise against touching any electrical connections.
Basic Replacement Instructions
1. Turn off Climate Control
2. Remove the passenger-side floor mat and move the seat fully back.
3. Use a pry tool to release the clips that hold the right-side front footwell cover to the instrument panel, and then disconnect the two electrical connectors inside.
4. Working from top-to-bottom, use a trim tool to release the right-side panel from the center console.
5. A single T20 screw secures the cabin filter cover, remove the screw and cover.
6. Fold the 2 tabs securing the filter away, and then pull the upper and lower filters out.
7. Ensure that the arrows on the new filters face towards the rear of the vehicle, and install them.
8. Proceed through steps 6-1 in reverse to reassemble.
Once again, these steps vary by vehicle configuration, model year, and do not apply to legacy vehicles without a heat pump.
By Not a Tesla App Staff
Apple has released its latest software update for iPhone, iPad, and MacOS, along with other systems. While the update includes many new features, such as RCS text message support, a customizable Control Center and many other features, we’ll focus on the ones that apply to Tesla and the Tesla app.
Control Center
With iOS and iPadOS 18, Apple overhauled Control Center. Visually, it remains very similar to its previous incarnation, except that you can now customize it in several ways. First, you can resize each button. Most icons can be customized so that they take up a single square, two spots or four. While Tesla doesn’t support any native actions for Control Center yet, you can create your own shortcut using Apple’s Shortcuts app and add it to Control Center (see below). The action can preheat/precool the cabin, start charging, unlock the vehicle or many others. To set a custom action, simply swipe down to Control Center, tap the plus (+) icon on the top-left corner, and choose Add a Control at the bottom.

Customize Tesla App Icon
iOS 18 also adds support for dark icons and customizable tint options. That means that you now have a degree of control over what the Tesla app icon looks like. To use dark icons while Dark Mode is active on the phone, tap and hold on any app icon and choose Edit Home Screen. When the icons start jiggling, tap the Edit button on the top left and choose Customize.
At the bottom of the screen, you’ll now be able to choose between various methods of customizing your app icons. You can pick from two app icon sizes, choose light/dark app icons and choose a color for tinting all icons.
The Tesla dark icon is a red T on a black background, while the light icon remains the same white T on a red background. The Tinted option allows you to tint all of your app icons in your preferred shade.
Lock Screen Buttons

The iPhone has had two lock screen icons for several years, which include shortcuts to the flashlight and camera apps. However, with this update, you can now swap out those icons for other apps or custom actions. Since the Tesla app doesn’t support any actions yet, you’ll need to create a shortcut first, then you can apply it here or to the Control Center. Creating a shortcut for cabin preconditioning is one of the most useful options, as it gives you one-touch access to cooling your vehicle.
To set up custom lock screen buttons you’ll want to lock your phone first. then tap on your wallpaper in any blank area. Choose customize and then choose the lock screen. You’ll then see several options to add widgets or remove the icons from your lock screen. Start by removing one of the icons at the bottom, then tap the + button to add a new one. This could be the Tesla app, or a specific shortcut. If you want to use a shortcut, you’ll want to choose Shortcut Control Title. Once the menu comes up, you simply pick the shortcut you created.
Locking Tesla to Face ID
With iOS 18, Apple also introduced the ability to lock or hide certain apps. You can lock an app so that it requires Face ID before someone is able to access it. To set it up, just tap and hold on the app icon you’d like to lock and then choose the “Require Face ID” option. Like most things on iOS, if Face ID fails, you can still open the app with your phone’s passcode. If you prefer to hide an app, the process is similar. You’ll want to choose Require Face ID, and then the phone will prompt you whether you want to just require Face ID or if you’d like to hide the app.
If you choose to hide the app, the app icon will be removed from your home screen, and the app will only show up in the Hidden folder in the App Library. To access the App Library, swipe left after you get to the last home screen. To bring up a list of your hidden apps, tap the Hidden folder at the bottom and authenticate with Face ID.
Keep in mind that locking or hiding your app comes with several disadvantages. If you lock your app, then all Tesla notifications won’t be readable without first authenticating with Face ID.
Creating an Apple Shortcut & Using Siri

You can create your own custom action with Apple Shortcuts. They can be extremely simple, like unlocking your vehicle, and require only a couple of minutes to set up.
To create a shortcut that could be utilized in Control Center, on the Lock Screen or as the Action button, open the Apple Shortcuts app.
Once you’re there, tap on the plus (+) sign at the top right corner of the app. On the bottom half of the screen, scroll up until you find the Tesla app and tap it. You’ll then see a list of all supported Tesla functions.
You can tap on any action such as Start under ‘Precondition Vehicle’ or Unlock vehicle. After choosing your preferred option, you’ll need to choose the vehicle it applies to, even if you have a single vehicle on your account. Simply tap the Choose Vehicle text and pick your car.
If you’d like to name the action, you can tap on the name with the down arrow at the top center of the screen and choose rename. After renaming your action, you can simply tap done and exit the app.
You can now run the action by simply saying its name when you bring up Siri, such as “Hey Siri, start car.” You can also take this shortcut and add it to Control Center or the lock screen for quick access.
Action Button

With the new iPhone 16 model, Apple has replaced the mute/vibrate toggle with the Action button for all phone models. The Action button can be used for any action you’d like, but assigning it to a shortcut allows you to perform certain Tesla functions like the ones we mentioned earlier that could be added to Control Center or the lock screen.
Cooling down the cabin can now be a single button push away, and you can even push it without removing your phone from your pocket.
Until Tesla adds native support for actions that could be added to different parts of iOS 18, creating a simple shortcut is your best bet to take advantage of the latest iOS 18 features.
By Karan Singh

Tesla plans to build a Cyber-stylized bear statue outside its Global Engineering Headquarters in Palo Alto, California. The CyberBear is a homage to the state that has housed Tesla for many years, which proudly displays a bear on its flag.
Tesla was originally founded in California over 20 years ago – back in 2003, and the company headquarters remained there until its recent move in 2021 to Texas. Tesla has a significant presence in California still – with the Fremont Factory and the Global Engineering Headquarters still there.
CyberBear
The CyberBear statue itself will be placed at the front of the Global Engineering Headquarters, which is located in Palo Alto. The filing for the proposed CyberBear statue mentions the following key details.
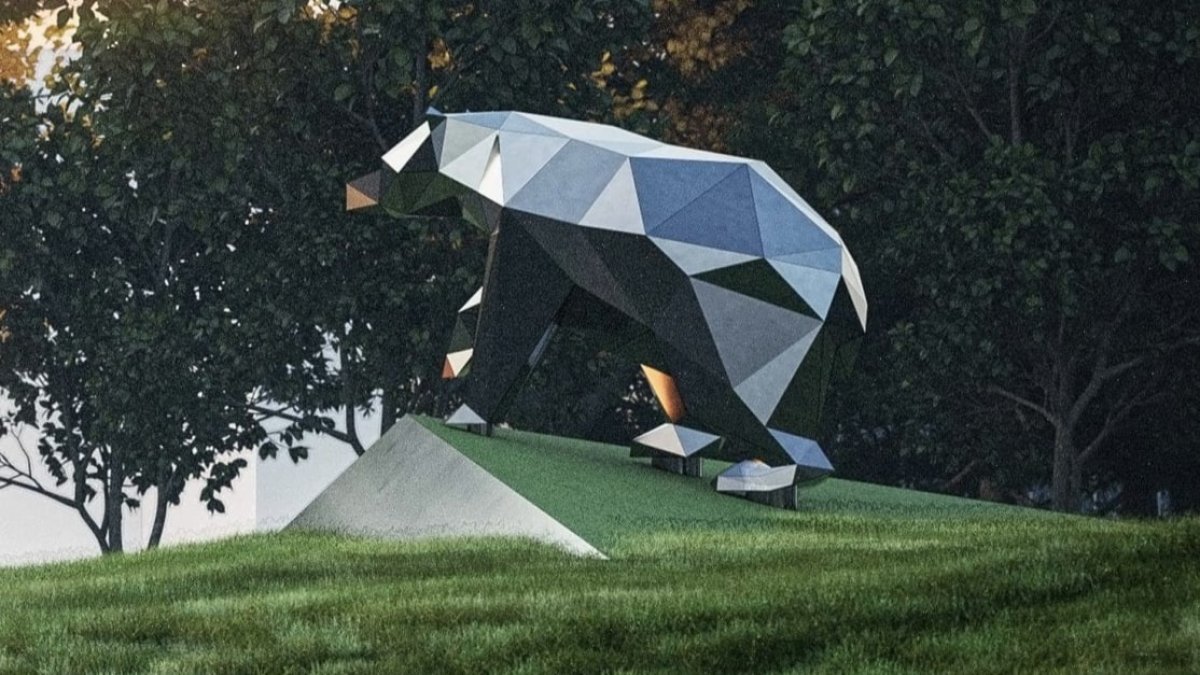
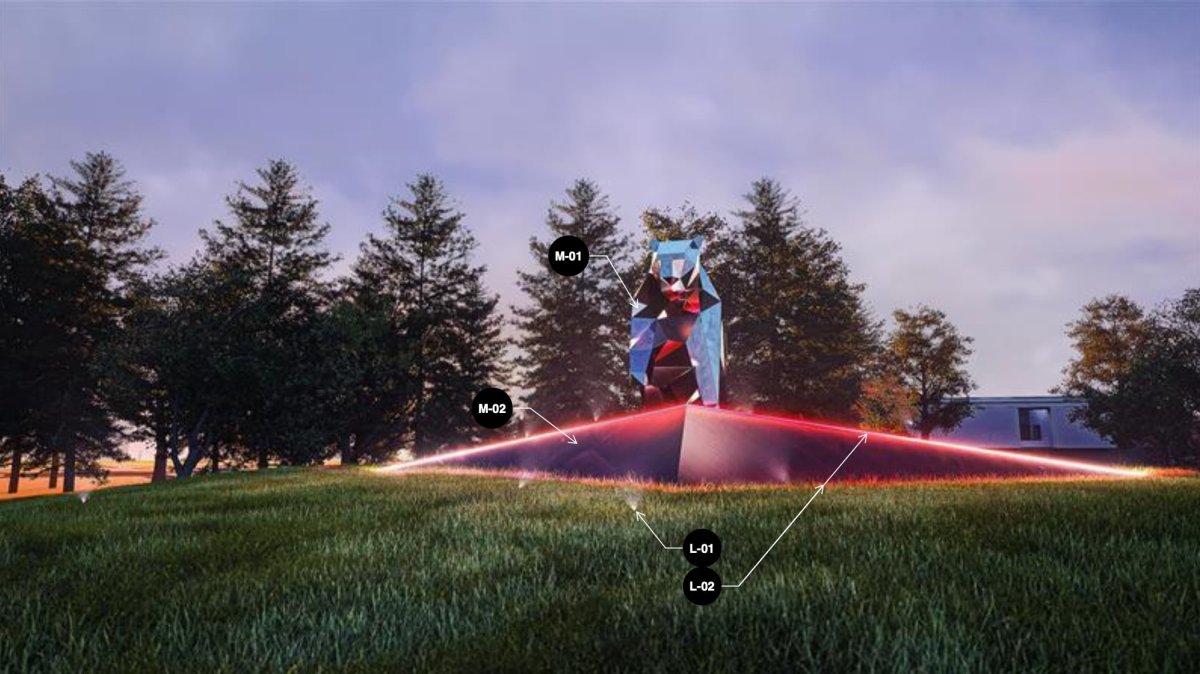
The CyberBear sculpture was designed in-house and is a stylized, low-poly California Grizzly Bear meant to combine Tesla’s design language with California. It will highlight the common message of strength and unyielding resistance.
The filing also goes on to mention that the statue will be built with metal, which will then be brushed down to an aged finish. It will be mounted on a concrete platform, which will be embedded with RGB lights – aimed at the bear.
The CyberBear will likely be reminiscent of the CyberOwl – which is Tesla’s Sentry Mode icon for the Cybertruck. While this interesting new project hasn’t quite lifted off past the proposal stages yet, we’re excited to see what it’ll look like once it is all completed.
While Tesla does mention “aged metal” in the filing, there is a good chance that they could use the same stainless steel as the Cybertruck instead.
link


